Traditional Mars Bar Slice Recipe

Traditional Mars Bar Slice Recipe

I just have to put this traditional Mars Bar Slice recipe on my website, is what I decided after quite a bit of thought.

Yes, I know that everyone basically already knows how to make a mars bar slice, and that there are many and varied ways to make it including the fabulously sweet idea of covering it in chocolate as well as drenching it in mars bar.

But this recipe is mine. Rather, it belongs to my late mother-in-law and she made it so may times and has provided such detailed instructions, that it is precious to me.

Plus, I do make it at least a couple of times a year, so I will be pleased to have it sitting neatly on my website next time I want to find it.

So here it is, the simply delicious version of a Traditional Mars Bar Slice Recipe.

And no, I don’t believe adding extra chocolate to the top because you can’t improve on perfection folks.

Dani

Mars Bar Slice
 
Author:
Ingredients
  • 3 Mars Bars
  • 90grams of butter
  • 3 cups of Rice Bubbles
Instructions
  1. Place butter and mars bars in a large saucepan and melt together over very low heat.
  2. When the butter is close to being melted break up the mars bars with a spoon and start to stir a bit. Continue to "mash" and stir until it is all melted- then continue stirring until the mixture is a completely even consistency and all the same colour.
  3. Stir in the rice bubbles until it is all combined.
  4. Press it into a slice tin.
  5. Refrigerate (it sets pretty easily). Allow 1 hour minimum.
  6. Take the tin our of the fridge and allow it to come up to room temperature so that you can cut it without shattering.
  7. Keep in a jar or tin in the fridge until it is all eaten!!

Traditional Mars Bar Slice Recipe

Love Chocolate?

You might also enjoy.

Creme de Menthe Pie Recipe

Salted Caramel Slice

Filled Speculaas Recipe

Filled Speculaas Recipe

This amazing Filled Speculaas Recipe comes to me courtesy of my Aunty. I am not really one to hide or keep my recipes secret (obvs) but there is a little something special about this very traditional recipe that made me think twice about sharing it.

It makes a very delicious cake with three layers, the middle layer being a lovely, light version of home made marzipan. The spicy, scented cake on the top and the base is buttery and delicious.

Continue reading

Caramel Meringue Tart Recipe

Caramel Meringue Tart RecipeCaramel Meringue Tart Recipe

This is another recipe that comes via my husbands Grandmother.

I love to think of her cooking this sweet pie to serve to the many guests who came to visit her in Gippsland. She was well known for her generous hospitality and for always having something delicious to serve her guests.

We visited her old house recently. It sits proudly on a corner block in the middle of a country town. Easy walking distance to most things. I imagine her walking regularly in to town to get her supplies and perhaps stopping to talk to the other locals along the way. This was a farming community and I am sure that she was the kind of woman that helped give a community its heart and soul.

Even though the house is now old and a little run down it still has a generous air to it. Maybe it is because of all the stories I have been told about bustling times where it was full of family and guests, little children and cake. Or maybe some houses are just lovely no matter how old they get.

Wherever this pie was served, I am sure it was well loved. My family were delighted when I made it for them. It won’t keep for long, but that probably won’t be a problem.

Crispy pastry, gooey “caramel” and glistening meringue on top.

A little hint from a busy Mum, you could always purchase a tart case from the supermarket to save time.

Caramel Meringue Tart Recipe
 
Author:
Ingredients
  • 1.5 cups of flour
  • 2 tablespoons of castor sugar
  • 2 tablespoons of butter softened
  • 1 egg beaten
  • 2 eggs extra
  • 1 cup of brown sugar
  • vanilla essence
  • 2 tablespoons of butter
  • 1 tablespoon of corn flour
  • 3 tablespoons of water
  • pinch of salt
  • 1 cup of milk
  • 2 tablespoons of castor sugar
Instructions
  1. To make the pastry
  2. Place the flour and sugar in a bowl and mix together.
  3. Rub in the butter until it resembles fine bread crumbs.
  4. Add egg and enough water to mix to a soft dough. Knead into a smooth ball and refrigerate for 30 minutes.
  5. Separate the eggs.
  6. To make the caramel.
  7. Add the yolks to the water and beat until mixed together.
  8. Place the brown sugar and corn flour in a bowl and add in the yolk mixture.
  9. Heat up the milk until nearly boiling and pour this into the flour. Cook over a gentle heat until thickened. Add in 2 tablespoons of butter and a few drops of vanilla essence and stir thoroughly.
  10. To make the meringue.
  11. Take the two egg whites in a separate bowl and add the castor sugar. Beat thoroughly until thick and peaks form to make your meringue.
  12. Lay the pastry between two sheets of greaseproof paper and roll out to required thickness. Lay it in your pie tin and pierce with a fork a few times. Bake it in a moderate oven until light brown (15 minutes)
  13. When cooled, add in your caramel and then spread the meringue over the pie and bake in the oven util brown (approx 15 minutes)

Caramel Meringue Tart Recipe

You might also like

Creme de menthe pie recipe. 

Home made nut bar recipe.  

Cauliflower with capers and lemon.


Orange and Vanilla Nut Biscuit Recipe

Orange and Vanilla Nut Biscuit RecipeOrange and vanilla nut biscuitOrange and vanilla nut biscuit

This orange and vanilla nut biscuit recipe is a bit of a variation on traditional biscotti.

It creates a lovely, orange scented, airy vanilla biscuit perfect for eating with a cup of tea and the nuts add a lovely texture.

Try crushing your own mixture of nuts if you would like. I use the Jamie Oliver method of popping them into a bag and bashing them with a rolling pin. You will want the nuts to achieve some even-ness of texture for use in this recipe.

Orange and Vanilla Nut Biscuits

Beat together 2 eggs with 150g castor sugar until it is light and airy.

Add 1/2 teaspoon of vanilla essence and the grated peel of 2 large oranges.

Fold in 105 g flour and 75 g of crushed nuts (I used almonds and some hazelnuts).

Spread over 25cm by 30cm baking sheet and cook for 15 minutes at 180 degrees celsius.

Cut into thin sticks while hot

Remove and eat when cold (if you can wait).

Notes

I just spread my mixture out onto baking paper on an oven tray. This means that there were some “spare” rounded corners when I did my cutting.

I am not a perfectionist when cooking and these little odd shaped corners did not bother me, but if you were baking for others then I guess you would want to trim them off and put them in the pantry for emergency snacking.

You can see them in some of my photos.

Happy Eating.

Dani xx

Orange and vanilla nut biscuitOrange and vanilla nut biscuit


Orange & Vanilla Nut Biscuits
 
Prep time
Cook time
Total time
 
Author:
Recipe type: Baking
Cuisine: Traditional Australian
Serves: 22
Ingredients
  • 2 eggs
  • 150g castor sugar
  • Add ½ teaspoon of vanilla essence
  • The grated rind of 2 large oranges
  • 105 g plain flour
  • 75 g of crushed nuts (I used almonds and some hazelnuts)
Instructions
  1. Beat together 2 eggs with 150g castor sugar until it is light and airy.
  2. Add ½ teaspoon of vanilla essence and the grated peel of 2 large oranges.
  3. Fold in 105 g flour and 75 g of crushed nuts (I used almonds and some hazelnuts).
  4. Spread over 25cm by 30cm baking sheet and cook for 15 minutes at 180 degrees celsius.
  5. Cut into thin sticks while hot
  6. Remove and eat when cold (if you can wait).

You might also like.

Overnight oats with grated apple.

Beetroot and goats cheese tart. 

Most luscious lemon tart. 

Cauliflower steak with lemon and capers. 


Opa’s Butter Biscuits Recipe

Opa’s butter biscuits recipe

butter biscuits recipe

The life lesson here seems to be, don’t let me near your family cook books unless you like sharing.

I tend to find those old hand written and reliably dog eared pages in a home cooks collection an absolute treasure trove.

So it is with this recipe, lifted from my own Mum’s plastic coated, age old collection of family recipes. This one is titled “Butter Biscuits (Opa’s)” and so I know that at some point it made its way across the seas from the family bakery in the Netherlands many years ago.

It must be good right because why else would a Bakker bother taking it with them and then holding tight to it and passing it down the family?

When I first gave the recipe a try, I immediately remembered…. indeed it is a good recipe.

With the first buttery bite of these sugary biscuit I am transported back to my Oma and Opa’s windmill’d red, green and white house in the Yarra Valley. In tasting these cookies I am remembering my childhood and my grandparents and their ornately decorated lounge room where the adults talked and talked for hours.

These cookies are very sweet and very buttery and as such are a bit of a treat at my house. Worthy of serving at Christmas time I think.

Opa’s Butter Biscuits
 
Prep time
Cook time
Total time
 
Author:
Recipe type: traditional
Ingredients
  • 8 oz butter
  • 8 oz sugar (less 1 tbsp)
  • 1 egg
  • 8 oz plain flour, sifted
  • a pinch of salt
  • 1 tbsp S.R. flour
  • 6 drops of lemon essence
Instructions
  1. Cream the butter and sugar until almost white.
  2. Add the egg and lemon essence and mix well.
  3. Add the sifted flour and a pinch of salt. Stir until just mixed together.
  4. Drop teaspoons full of mixture onto a lined baking tray and cook in a moderate oven until golden brown. (12-15 minutes).
Notes
Keep a close eye on the cookies as they bake as you don't want to over cook them.
Space them out nicely on the tray as it is a wet mixture and they will spread.
This recipe is not any good for making into shapes as it is too soft.

Enjoy.

Dani xx


Dani B is a food and lifestyle blogger from Melbourne. She loves experimenting with new recipes and discovering old treasured classics.  You can find some of her favourite recipes here.

She also runs Dani Bee social media management Melbourne.


Looking for something else to cook?

How about this risotto picnic pie?

risotto pie

Marshmallow Pavlova Recipe

Marshmallow Pavlova Recipe

I am infamously quoted among my extended family as having said “I don’t really eat dessert” and then also, not long after , “‘I’ll have a little bit more please” at one of my first Christmas dinners with my new family.

So it goes with this, the  Bruce family Marshmallow Pavlova.

I really am not that much of a dessert eater, unless it involves fruit, cheese or chocolate. But this pavlova is perfect. Marshmallowy, crunchy and sweet all at once.Marshmallow Pavlova Recipe

My absolute favorite (but definitely not traditional) way to decorate it is with too much cream, generous drizzles of melted white chocolate, little chocolate balls and some fresh berries.

I have also experimented with rose water & chocolate in the base as flavorings.

The Bruce family stick to a strict regime of fresh fruit and flake or peppermint crisp as toppings. You can’t really go wrong with these.

This recipe belongs to my late Mother-in law. She taught me a lot about cooking sweet food. She loved cakes and sweets and had a huge repertoire of recipes that were tried and tested. She added her own notations to them year by year, always eager to share the secret tricks to getting these recipes perfected.

I often think back to the advice she gave me when I was home looking after my first baby. Tired, exhausted and completely bamboozled by this new task I had before me to raise a tiny, gorgeous human, she supported me in a vast array of practical tasks without judgement or comment.

Her advice was this

“Always have a packet of biscuits handy for yourself. If you get up in the middle of the night to feed the baby and you are hungry, you will have something to eat.”

In essence what she was saying was “look after yourself” and it was very valuable and precious advice.

She was that kind of person.

I have printed her “notes” here for your enjoyment and to help you make an awesome pavlova.

Her number one rule of pavlova making (and she made many, many pavolvas in her time) was this.

“Just have a bash at it because you can’t get it too wrong and either way it will be delicious.”

So here it is, our Traditional Marshmallow Pavlova Recipe.

Marshmallow Pavlova Recipe

Traditional Marshmallow Pavlova Recipe

Just like Grandma used to make. 

Course Dessert
Cuisine Australian
Keyword Pavlova
Prep Time 10 minutes
Cook Time 1 hour 30 minutes
Total Time 1 hour 40 minutes

Ingredients

Ingredients

  • 4 egg whites
  • 1 cup of caster sugar
  • 1 dessertspoon of cornflour
  • 1 teaspoon brown vinegar

Instructions

Method

  1. Beat egg whites until stiff.

  2. Add 1/2 cup of castor sugar, beat thoroughly until the sugar is dissolved- about 5 minutes.
  3. Add remaining sugar, 1 tablespoon at a time, beating well after each addition.
  4. Lightly fold in the cornflour then the vinegar.
  5. Scrape the mixture out into a pile onto grease proof paper. Shape it into a circle and keep it fairly high in shape as it spreads a bit as it cooks.
  6. Place on a low shelf in a pre heated oven 200 degrees celsius, then immediately reduce heat to 125 degrees and cook for 1 1/4 to 1 1/2 hours. Cool in the oven.

Recipe Notes

Note that the pavlova will shrink and crack on cooling- that is normal- just fill it with whipped cream and toppings.

Important Extra notes for eggselent pav.

  • Buy medium eggs and make sure they are room temperature before using.
  • Seperate the egg whites from yolks into a cup one at a time before adding them to a  big basin as you must not get any yolk in with the whites as it will prevent fluffiness and a good stiffness of the whites.
  • Put the whites into a dry, clean basin- no greasiness. Warm it a little first if you like, to help the egg whites fluff up more (sometimes I warm the beaters in the oven for a few minutes first so that the egg whites fluff up more.)
  • When you first beat the egg whites don’t over beat them- just beat until soft peaks form and it is reasonably stiff- lift the beater up and see if it holds in a peak with only the top bending over. Once you have added some sugar you can beat them as much as you like. Beat until all the sugar is dissolved.
  • I am usually generous with the vinegar and cornflour. It using an electric mixer just gently beat on low speed- til just mixed in.
  • Putting the pavlova in at high temperature puffs it up well, then lower the temperature for cooking- an extra quarter of an hour never hurts as it makes a bit more of a crisp crust. Sometimes you check it when the time is up and the crust seems quite fragile- just cook it another 15 minutes and be sure to check it.
  • In the cooler weather the pavlova will cool faster and crack a little more but if left in the warmth too long it can sweat.
  • I usually cover with a light food cover until its quite cool- put on a plate and in the fridge until ready to se. It will be Ok in there for a couple of days. If you want to keep it longer pop it in the freezer- it should be Ok for about 4 weeks.
  • For the topping you can beat some cream well and add some icing sugar and vanilla.

Happy Eating.

Dani xx

My chocolate version.

Enjoyed this recipe?

Then you might like to see some of my other traditional recipes.

Opa’s Butter Cookies. 

Traditional Cheese Biscuits recipe. 

Cheese Biscuit recipe. Just like Grandma used to make.

Cheese Biscuit recipe with cayenne & poppy seeds.Vintage Cheese Biscuit recipe with cayenne

The recipe for these “Cheese biscuits”come to me via my husbands mother. We were very fortunate to inherit a bag full of old, loose, handwritten recipes as well as a long list of my mother-in-laws own family recipes.

A lot of the recipes have very basic instructions and I assume this is because they were so familiar to the maker that they never really required any complicated notes. For generations recipes were handed down this way, by cooking in the kitchen together and passing on all the secrets and tips through the process of cooking together, rather than through the written word.

I have quite a few recipes that I learned this way and maybe you do too.

But back to the cheese biscuit recipe. They came with a note to mix together, roll flat and bake in the oven. Through trial and error I have elaborated on those instructions and I have also added in my own extra ingredient, poppy seeds.

These biscuits are surprisingly very tasty and with the addition of cayenne pepper are probably more to the preference of adults, although my children did enjoy eating them too.

I have tested this recipe out on some friends with great success.

The mix creates a cheesy, fully flavoured biscuit with a little crunch and more lightness than you would expect. Serve them with a good cheese and a slice of crunchy pear, or cut them into small squares to add to a cheese plate.Cheese Biscuit recipe

Or just eat simply on their own, they are a little addictive.

I hope you will like it too.

Cheese Biscuits
 
Prep time
Cook time
Total time
 
Author:
Serves: 12-14
Ingredients
  • 1 cup of S.R. Flour
  • 5 tablespoons of grated cheese
  • 1 tablespoon of butter, melted.
  • ½ teaspoon of salt
  • 1 tablespoons of poppy seeds
  • 1 tablespoon of sesame seeds
  • a large pinch of cayenne pepper
  • 4-6 tablespoons of cold water
Instructions
  1. Preheat your oven to 200 degrees celsius.
  2. Add all the SR flour, cayenne, poppy seeds,salt and cheese to a mixing bowl and stir to mix.
  3. Pour in the melted butter and slowly add in the cold water until the mixture starts to come together. Use a butter knife to pull it together as you slowly add the water.
  4. When the mixture has come together, roll it into little balls.
  5. Get a baking tray and cover it with baking paper.
  6. Add the cheese balls to the tray and squish them flat.
  7. Use a rolling pin to roll them flatter still.
  8. Put them in the oven and bake for 15-20 minutes but keep an eye on it as you want them to cook through, but not burn. They should be nicely brown and crisp.
  9. Enjoy on their own or as part of a cheese platter.
Notes
Use as much cayenne pepper as your heart desires, but start out with just a little bit as you do not want the flavour to overwhelm.

I plan to experiment with cutting these biscuits into flat squares too.

Cheese Biscuit recipeI enjoyed using the “cayenne pepper” which is not really an ingredient that I use much in my kitchen. You can add as little or as much as you like. I get more lavish with the cayenne each time I make them but I do keep in mind that my kids will probably complain if there is too much of it.Cheese Biscuit recipe

I really love discovering traditional recipes that have truly withstood the test of time. Do you have a favourite recipe handed down through the generations in your family? I’d love to hear about it.

Happy Cooking.

Dani xx


I think I am finally ready to admit that Christmas is on the way. For me that means I first had to deal three birthday parties for my children, in four weeks. Now that is over, I am finally feeling a little excited about the festive season.

To that end, I just had to share with you the beautiful Christmas range from another affiliate, Williams Sonoma. You can order online and if you spend over $99, shipping is free.

Do you have your Christmas plans sorted yet? I am looking forward to decorating our new house and enjoying our nightly hot chocolate bar tradition.

More on that soon.

Dani


Almond Cherry Cake Recipe. Easy to bake at home.

Almond Cherry Cake Recipe

I love to have a cake ready fresh out of the oven for my kids when they come home from school in the afternoon. In reality, this does not happen that often Almond and sour cherry cakebecause I work and have a whole host of other things that take up my time besides baking cakes. But I guess that is part of the charm when it does happen.

This almond and cherry cake recipe really seemed to hit the spot this week and I am not surprised because it is based on the recipe for one of my favourite sweet treats, the Friand.

I first tasted a raspberry friand when I was pregnant with my first child and a lovely friend brought a tray of them around to my house for morning tea.

I remember the sweet, intoxicating days of the first pregnancy well, when I did not have other children to look after. Who knew that my life was about to change so dramatically- certainly not me.

Anyway, we ate cakes and talked and it was wonderful to have a friend who was so excited for me and my growing bump.

I have been addicted to the buttery goodness of friands ever since.

Part of the other appeal of this recipe is that it does not have much gluten in it, and my next challenge will be to remove the gluten all together by perhaps using a coconut flour and some raising agent in place of the half cup of SR flour. Fingers crossed I can get it to work.

Earlier in the week I bought myself a jar of Morello Cherries as an impulse purchase from the supermarket. Anyone else love looking through the “European foods” section of the supermarket to find unusual products? Well these cherries were my discovery and while they are too sour to eat on their own, they were perfect in this sweet, buttery cake.

You can really substitute nearly any fruit in to this recipe. Peaches, plums, pears, cooked apple, frozen berries, almost anything you could think of. So it can be a great recipe to have in your repertoire.

I found this recipe in a cook book somewhere when I was younger and I did the nineties version of “pinning it.” I wrote it down on a piece of paper and popped it in a folder.

So thank you to wherever it came from!

Almond and sour cherry cake

Almond Cherry Cake Recipe
 
Prep time
Cook time
Total time
 
Author:
Recipe type: Dessert
Cuisine: Australian
Serves: 6-8
Ingredients
  • 150 grams of butter
  • 150 grams of butter
  • 6 egg whites
  • 6 egg whites
  • 1 tablespoon of milk
  • 1 tablespoon of milk
  • 1 teaspoon of vanilla extract
  • 1 teaspoon of vanilla extract
  • 185 grams of almond meal
  • 185 grams of almond meal
  • 240 g of sifted pure icing sugar
  • 240 g of sifted pure icing sugar
  • ½ cup of SR flour
  • ½ cup of SR flour
  • 1 cup of drained (pitted) morello cherries or similar fruit
Instructions
  1. Preheat oven to a moderately low temperature (160 celsius)
  2. Grease and line a deep 20cm round tin, I used my heart tin but it works better in a round tin.
  3. Place your egg whites in a bowl and whisk until combined
  4. Melt your butter in a small saucepan.
  5. Add the milk, vanilla, melted butter, icing sugar and self raising flour. Stir until it is just combined.
  6. Pour the mixture into a prepared tin and top with fruit.
  7. Bake for about 1 hour and 30 minutes.
  8. If the top gets too brown during the baking process you might like to place a piece of foil on top to keep it from browning.
  9. Allow to cool slightly in the tin before turning it out onto a wire rack to cool.
  10. Dust with icing sugar and a few extra cherries and enjoy.

I hope you enjoy it as much as I do.

Dani xx

Almond cherry cake recipe


Dani B is a food blogger and writer from Melbourne. You might like to see some of her other deliciously sweet and sweetly traditional cake recipes. 

Good Cream Cake Recipe

Vintage Cream Cake Recipe 

Confession time. I have a slightly weird hobby.

No I don’t race ferrets and I’m not an “Extreme Ironing” competitor, although I do fancy myself achieving quite well in a “mooing competition.”

I collect old recipes.

Some of them are quite smelly in that very well used, very old book kind of way.

I hide them around my house, some in the office and some in the laundry and I dream about a day where I will get to cook some of the weird and wonderful recipes from within their musty pages.

Some of the recipes are in magazines that are actually quite beautiful, but some of them are definitely untidy and ugly.

But they all contain a fairly interesting sense of history and story when it comes to the food we eat and the way we cook it.

I love trawling through op shops to find these treasures and one of my more interesting recent finds was a completely useless book on food and architecture. It sounds so promising right? Well it was not.

When I first started out on my blogging journey I was keen to share some of the more vintage style recipes that have been given to me or left to me and this year I am getting back to basics by finally publishing a few more of my favourites.

Todays comes courtesy of a post-it notes sized piece of old, loose paper with a handwritten family recipe on it.

“Good Cream Cake .”

It comes with very few instructions, nor does it have an explanation as to why it is called a good cream cake. But it must have been precious to have been kept for so long.

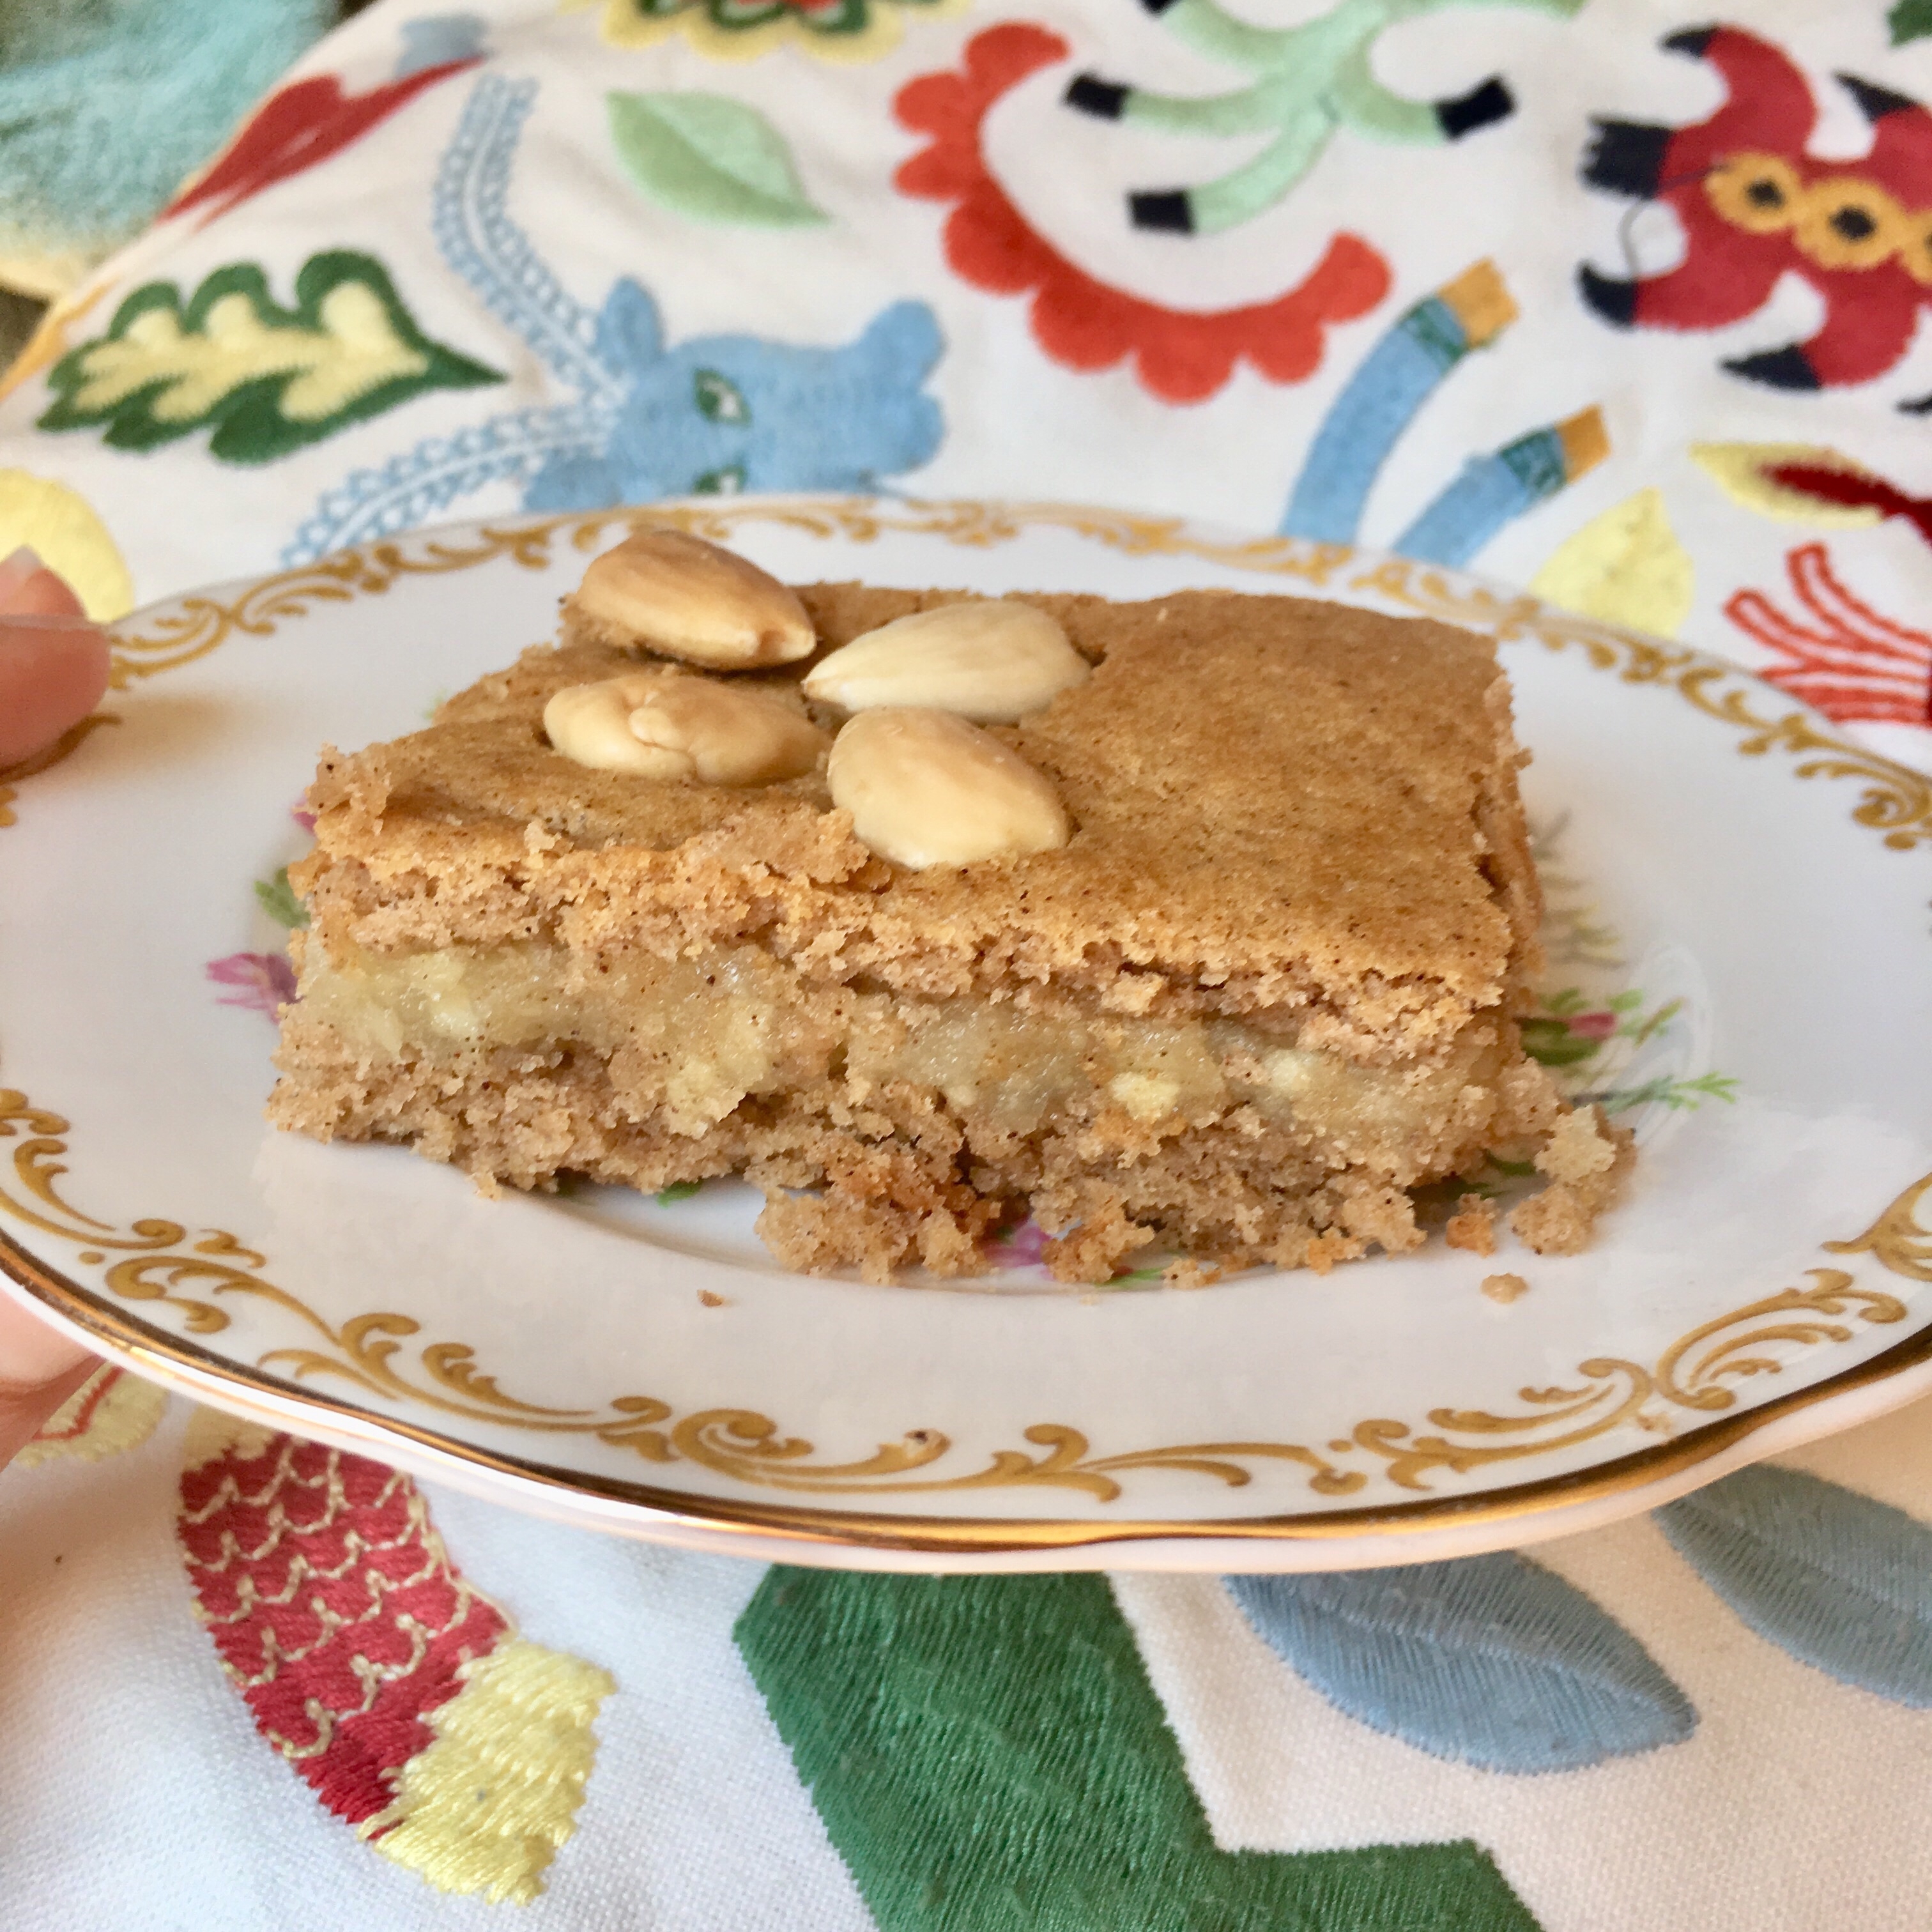
A little bit of research though suggests that this is a good solid cake for covering with fresh cream and fruit.

It is definitely not a light and airy sponge, but a buttery cake with a lovely crumb. I am guessing that it was meant to look a little something like this.

http://clickamericana.com/recipes/dessert-recipes/cinnamon-apple-cream-cake-recipe-1940


I have included the original instructions, as well as my own notes from making it. I iced it and then added jam and cream like a sponge, but I think it could so with something more sturdy than that.

Cream Cake Recipe

1 small cup of sugar

2 eggs

1 1/2 tablespoons butter, vanilla essence

1/2 cup of milk

1 1/2 cups of flour

1 teaspoon of cream of tartar

1/2 teaspoon of soda

Bake in a brisk oven from 3/4 to 1 hour.

Notes

  • I discovered very quickly that one (1) teaspoon baking powder is equivalent to 1/4 teaspoon baking soda plus 1/2 teaspoon cream of tartar, so I just used 2 teaspoons of baking powder in place of the tartar/ soda.
  • There were absolutely no instructions apart from the “bake briskly for 3/4 to 1 hour” which suggests it should be cooked somewhere between 200 degrees celsius and 230. I thought this sounded way to hot so I lowered it to the standard 180 cake baking temperature. Feel free to tell me I am wrong! Perhaps I would have got a slightly higher rise out of my cake if it was in hotter?
  • I also dropped the time to 40 minutes and then took the cake out. It was cooked beautifully on the inside and was starting to get a little dark on the top.
  • I ended up with a fairly dense cake that tasted delicious!
  • I whisked the eggs and added the dry ingredients together first. Then in with the milk, eggs and butter. Stir until smooth.
  • I made a really nice icing out of icing sugar, the juice of a couple of frozen berries and raspberry tea. The tea gave it a lovely pink flavour and also a lovely, mild, fragrant flavour.

This is what I ended up with.

Cream Cake Recipe

This was a very simple cake to make but it was also very tasty. I can imagine it would tolerate lemon or orange rind and a zesty cream cheese icing quite well. I feel like it is definitely asking for fruit of some sort on top.

So, do you know what a “cream cake” is? Can you provide me any more information on what I should do with this time honoured, simple and effective recipe?

Do you have a favourite vintage (old) recipe that has been passed down from one generation to the next?

Happy eating.

Dani xx


Dutch Apple Cake with Salted Caramel Sauce

Easy Dutch Apple Cake with Salted Caramel Sauce

The birds woke me this morning, stealing from me my one opportunity for a small sleep in. There was a time in my life where I never heard bird song. The birds didn’t seem to like where I was living and I was never quite sure if I agreed with them. This morning I would have been happy for some peace from their singing. I think maybe they were staging an opera.

This easy dutch apple cake recipe is a bit of an old gem that has been handed down through the family stuck neatly in an old dog eared note book that has grown thin and crackly from time and use. I thought I would like to publish it before it disappears. The ribbony caramel sauce is my own recent addition, taking this cake somewhere extra special.Easy Dutch Apple Cake

I note that there are already a number of versions of this easy dutch apple cake on the internet. This one calls for quite a lot less sugar comparatively and I like it that way. The apple and caramel on top add their own unique sweetness. Be sure to serve it with cream or ice cream to get the best flavour from it.

You are sure to be tempted by the lovely aromas of warmed cinnamon and sugar as it bakes.Easy Dutch Apple Cake

Slice the apple thinly and be patient with the cooking time.

This is quite a crumbly cake and so the addition of salted caramel sauce drizzled over the top provides a little extra creaminess.

Easy Dutch Apple Cake


Dutch Apple Cake

Lovely traditional Dutch apple cake recipe

Course cake
Cuisine Dutch
Keyword Apple Cake
Prep Time 10 minutes
Cook Time 40 minutes
Total Time 50 minutes

Ingredients

Ingredients

  • 1/2 cup of butter
  • 1/2 cup of sugar
  • 2 eggs
  • 1 Teaspoon of vanilla essence
  • 2/3 of a cup of milk
  • 2 cups of SR flour
  • pinch of salt
  • 2 cooking apples 2 tablespoons of sugar, pinch of cinnamon and spice for top.

Caramel

  • 65 grams of butter
  • 1/2 cup of brown sugar
  • 1/2 cup of cream
  • pinch of salt

Instructions

Instructions

  1. Cream butter and sugar, add well beaten eggs and vanilla.
  2. Stir in the sifted flour and salt, alternating with the milk.
  3. Spread in a well buttered tin.
  4. Cut peeled and cored apples into slices, and arrange on top of batter.
  5. Sprinkle with cinnamon, sugar and spice.
  6. Cake in a good oven (175 degrees) for 30 -40 minutes.

For the caramel.

  1. Melt butter gently over low heat before adding the sugar and stirring until it is dissolved. Add cream and salt and mix until smooth. Serve with cream and caramel.

Recipe Video


This cake is a lovely way to use up the abundance of apples that we have available to us all year around here in Melbourne. Easy Dutch Apple Cake

The beautiful Royal Doulton dinner set used in these images was sent to me by an Australian family run company “Everton. Love to Cook.” When they asked to work with me it seemed like a perfect match as I too love to cook.

You can order a great range of cookware, kitchenware and more on their website.

www.everten.com.au

I am very much enjoying having it’s sage green hues gracing my dinner table.

Happy Cooking .

Dani xx